Baked Swai Fillet Recipe
The lemon pepper on this Baked Swai Fillet is salt-free on purpose. I brush thawed swai fillets with melted butter, add the seasoning, and bake them at 425°F until they flake. Swai has a mild flavor and soft texture, so a salty blend can take over fast. With a salt-free blend, you still taste the fish.

The first time I ate this fish, I knew it as cream dory, not swai. My mom picked up frozen cream dory fillets while we were shopping in the Philippines and cooked them for me. I was hesitant because I did not know anything about the fish at the time. It turned out mild and soft, and better than I expected. Years later, I found the same fish here in the US labeled swai.
The one thing I watch with swai is the moisture it releases in the oven. Line the baking sheet with foil and spray it lightly with oil so the soft fillets lift off whole.
What is Swai Fish?
Swai is the market name used in the United States for pangasius, a freshwater catfish farmed in the Mekong Delta in Vietnam. The same fish is sold as basa, tra, river cobbler, and iridescent shark. That last name belongs to a river catfish, not an ocean shark. In the Philippines it goes by cream dory.
Cream dory became popular quickly in the Philippines, and I understand why. The fillets are boneless, cost less than most fish at the market, and taste mild rather than fishy.
Compared to tilapia, swai is softer and thinner. The fillets have less bite to them and they cook a few minutes faster. That is worth knowing if you time fish by feel. Tilapia holds up better in soups and sauces, so I still reach for it in those dishes. You can see the range in my tilapia recipes. I reach for swai when I need a fish dinner that can be ready in about twenty minutes.
Baked Swai Fillet Ingredients
- Swai fillets – Usually sold frozen, often in 4 to 6 ounce pieces. Look for fillets of roughly the same thickness so they finish at the same time.
- Salt-free lemon pepper seasoning – Mrs. Dash is the blend I used. About two tablespoons covers six fillets.
- Butter – Melt it first and brush it on both sides. Two tablespoons is enough for six fillets without leaving a pool on the pan.
- Cooking oil spray – This goes on the foil, not on the fish.
The seasoning matters here because swai is so mild. Regular lemon pepper blends usually list salt as the first ingredient, so most of what you shake on is salt. On a fish this mild, that is all you taste. A salt-free blend is lemon peel, cracked black pepper, garlic, and onion, and none of it competes with the fish. Look for “salt-free” or “sodium-free” on the label. If you can only find the salted kind, use half as much and skip any extra salt.
Vanjo’s Advice
Swai can turn watery or dry quickly, so these details matter.
- Thaw the fillets all the way. You can bake swai straight from frozen and it will cook through, but the butter slides off the ice and the seasoning goes with it. I move mine to the fridge the night before. If I forget, twenty minutes in a bowl of cold water gets it done.
- Pat the fillets dry before the butter goes on. Pat both sides well with paper towels. A dry surface holds the butter, and the butter holds the seasoning.
- Keep the fillets in a single layer with space between them. Fillets that touch steam each other instead of baking. Two pans beat one crowded pan.
- Start checking at 10 minutes. Thin fillets from the frozen aisle are usually done right at 10. The thicker ones need the full 12. Swai goes from tender to dry quickly, so check early rather than late.
- Add cayenne if you want a little heat. A light sprinkle over each fillet before it goes in the oven is enough. Nothing else about the recipe changes.
- Use the air fryer when you do not want to run the oven. Swai works in the basket the same way tilapia does. I cook air fryer tilapia at 400°F for 7 to 10 minutes and swai fits right into that window
How to Cook Baked Swai Fillet
Get the oven and the pan ready first, then season the fish. Once the fillets are on the sheet, the rest moves fast.
Season the Fillets
- Preheat the oven to 425°F.
- Line a baking sheet with aluminum foil, then coat the foil lightly with cooking oil spray.
- Pat the swai fillets dry with paper towels and brush the melted butter over both sides of each one.
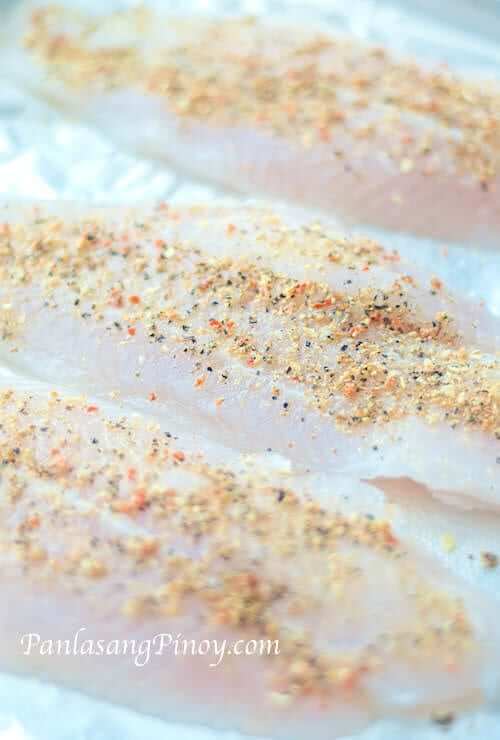
- Sprinkle the lemon pepper seasoning evenly over the fish, then arrange the fillets in a single layer on the sheet.
Brush the butter on before the seasoning goes down. The butter helps the seasoning cling to the fish instead of falling onto the foil.
Bake and Serve
- Bake for 10 to 12 minutes, depending on the thickness of the fillets. The fish is done when it turns opaque and flakes easily with a fork. The internal temperature at the thickest part should read 145°F.
- Transfer the fillets to a serving plate and serve warm.
Slide a wide spatula under the whole fillet. Swai is soft and it breaks if you lift it from one end. For thicker fish that needs a longer bake, wrapping in foil keeps it from drying out, which is how I handle baked salmon with lemon garlic and butter. Swai is too thin for that, and wrapping it just steams the fish.
What to Serve with Baked Swai Fillet
- Steamed white rice – The plain, obvious pairing, and the one I go with almost every time.
- Spicy vinegar – Vinegar, crushed garlic, and chili on the side. The vinegar cuts through the butter.
- Oven roasted broccoli – It roasts at a similar temperature, so you can run both on separate racks.
- Lemon wedges – Squeezed over the fish right before eating, not before baking.
- Sliced tomatoes and onions – A cold, sharp side you can put together while the fish bakes.
Storage
Baked Swai Fillet keeps for a few days, though the texture is best the day you bake it.
- Refrigerator: Store cooled fillets in an airtight container for up to 3 days. Keep them away from anything with a strong smell, since mild fish picks that up quickly.
- Freezer: Freeze the raw fillets rather than the cooked ones. Seasoned uncooked fillets wrapped in foil inside a freezer bag hold for up to 3 months.
- Reheating: Warm the fillets in a 300°F oven for 6 to 8 minutes, covered loosely with foil. The microwave works in a pinch but turns the texture rubbery.
More Fish Recipes
- Crispy Tilapia Sticks – Fillets in panko breadcrumbs, deep fried, for when you want a crisp coating instead of a simply seasoned baked fillet
- Parmesan Crusted Fish – Baked with a Parmesan and seasoning coating that also works with swai fillets as written
- Fish Fillet with Tausi – Boneless fillets in a salted black bean sauce, the Chinese restaurant version
- Sarciado – Fried fish served with a tomato and egg sauce, a good use for leftover fillets
- Fish Pochero – A tomato based fish and vegetable stew for when you want a full pot instead of a sheet pan
- Ginataang Bangus – Milkfish simmered in coconut milk with ginger and chili
Substitutions
- Swai fillets – Basa, tra, and cream dory are the same fish under other names, so use them as is. Tilapia fillets need no other changes, and I also bake them with a grilled pineapple salsa on the side when I want something brighter. Catfish and cod are thicker, so add 3 to 5 minutes and check the temperature.
- Salt-free lemon pepper seasoning – Mix your own from lemon zest, cracked black pepper, garlic powder, and onion powder. If you only have the salted blend, use half the amount.
- Butter – Olive oil brushes on the same way. The fish browns a little less, and you lose some of the richness.
- Cooking oil spray – Use parchment paper in place of sprayed foil. It prevents sticking and makes cleanup easier.
- Lemon pepper – Cajun or creole seasoning takes this in a different direction. Cut the amount to a teaspoon and a half, since those blends are salted.
Frequently Asked Questions
How long do you bake swai fish?
At 425°F, thawed fillets take 10 to 12 minutes. Drop the oven to 400°F and it is closer to 12 to 15 minutes. At 350°F, you are looking at 18 to 20 minutes. I use the higher heat because swai is thin and the shorter time keeps more moisture in the fish. Whichever temperature you pick, check for 145°F at the thickest part.
Can I bake swai in foil?
I line the pan with foil, but I do not wrap the fillets in it. Wrapping traps steam, and steamed swai comes out soft and pale instead of lightly browned and flaky. If you want to wrap it anyway, add a couple of minutes and open the foil for the last two so some of the moisture escapes.
Why did my baked swai turn out watery?
Almost always because the fillets still had ice on them, or because the pan was crowded. Swai holds more water than a fish like tilapia. Thaw the fillets fully and leave an inch between them on the sheet, and the liquid cooks off instead of pooling around the fish.
Do I need to rinse swai before baking it?
Rinsing is not necessary, and it puts more water on a fillet you are about to dry off anyway. Pat the thawed fillets with paper towels and go straight to the butter. Swai raised in warm ponds can carry a faint earthy taste, and a 15 minute soak in cold water with a squeeze of lemon takes care of it if you run into that
I keep this recipe simple: butter, lemon pepper, and about 12 minutes in the oven. Serve it warm with rice and lemon wedges on the side. Share and enjoy!
Did you make this? If you snap a photo, please be sure tag us on Instagram at @panlasangpinoy or hashtag #panlasangpinoy so we can see your creations!

Baked Swai Fillet
Ingredients
- 6 pieces swai fillets completely thawed
- 2 tablespoons salt-free lemon pepper seasoning blend
- 2 tablespoons butter melted
- Cooking oil spray
Equipment
- 1 Baking sheet Use a rimmed sheet so the liquid the fish releases stays on the pan
- 1 Aluminum foil Line the sheet and spray it so the soft fillets lift off whole
- 1 Instant read thermometer Check the thickest part of a fillet for 145°F
Instructions
- Preheat the oven to 425°F.
- Line a baking sheet with aluminum foil, then lightly coat the foil with cooking oil spray.Cooking oil spray
- Pat the swai fillets dry using paper towels. Brush the melted butter over both sides of each fillet.6 pieces swai fillets, 2 tablespoons butter
- Sprinkle the lemon pepper seasoning evenly over the fish, then arrange the fillets in a single layer on the prepared baking sheet.6 pieces swai fillets, 2 tablespoons salt-free lemon pepper seasoning blend
- Bake for 10 to 12 minutes, depending on the thickness of the fillets. The fish is done when it turns opaque and flakes easily with a fork. The internal temperature at the thickest part should reach 145°F.6 pieces swai fillets
- Transfer the baked swai fillets to a serving plate. Serve warm. Share and enjoy!6 pieces swai fillets



Margie Miller says
Delicious recipe and so very easy. I added a sprinkle of cayenne pepper on each filet
Vanjo Merano says
Thank you, Margie! I’m glad you enjoyed it. Adding a little cayenne pepper to each fillet is a great way to give it some extra heat.
Edna says
It was delicious
Vanjo Merano says
Awesome! Thanks for the feedback!
Takaki says
Is it all kinds of fish fillet can do?
Andrea G says
This recipe was delicious The 10 minutes was just right, as I was concerned it may be too long. I will do this again..
Jeanne K says
Tried this simple recipe. Not loaded with heavy batter & very tasty. Would definitely cook again, thanks!